Sunday, March 31, 2013

How to make Funfetti cupcakes even more Fun!

I love baking. I think it's so relaxing and it's the perfect way to spend a Saturday afternoon. I usually go for those really intricate recipes that take several hours and leave a whole sink full of dishes, but last weekend I was in the need of something different. At 7pm on Saturday night I got home from the gym and I needed to whip-up some birthday cupcakes before heading to my friend's place in two hours. While I'm sure my friends would have been happy with some regular funfetti cupcakes, I had a reputation to uphold, so I decided to jazz them up a little bit. I made rainbow colored tie-dye birthday cupcakes! So since this isn't a real recipe, and I just followed the funfetti box directions, I'll just tell this story through pictures:


Don't they look cool?! The colors came out so bright and everyone loved them.
So basically, once you follow the regular box directions- you split the batter up into six different cups.
Then you dye each cup a different color bu adding a little drop of food coloring at a time and stirring, continuing until you get the desired color.
Add one teaspoon of each batter to the cupcake pans. This was the most time consuming part, but it doesn't have to be perfect- using two teaspoons to scoop and then scrape was the fastest method I came up with. 
And obviously do purple to all of them first, then blue, then green, etc. (That may seem self explanatory but I know one of you out there was going cup by cup!) They looked so pretty and bright in the pan that I didn't want to bake them!

And there you have it! Add some silly icing, some sprinkles, and you have a really fun, funfetti cupcake surprise! 


And sticking with the fun theme.. here you go: http://www.youtube.com/watch?v=q7yCLn-O-Y0


Wednesday, March 20, 2013

I Love a Southwest Salad

Sorry it's been so long since I last posted- it's been a busy couple of weeks! I've had a wonderful 10 days of visitors- first my parents and then Erin and Emily, two of my former co-workers, came into town. My time was full of good conversation, good wine, and mostly good food. One of the greatest things for me about my parents visiting is that I'm always left with a fridge stock full of food. However, this blessing isn't the greatest thing for my new blogging hobby! While I've slowly been going through the restaurant left-overs, I had the day off work today and I decided to head back into the kitchen.

For one of the many concoctions we whipped up during my reunion weekend, a whole can of chipotle peppers was purchased. Now I love the flavor of chipotle, but I have to say, I don't really know who needs that whole can! Amongst the many things left in my apartment once all my wonderful friends departed, was an entire tupperware of delicious, smoky, spicy-sweet chipotle peppers. After whipping up some chipotle hummus, I realized I needed to make something a whole lot bigger if I was going to make a dent in my pepper stock. I knew I wanted to eat salads this week, because after a week of eating out, my veggie intake was seriously lacking. One of my favorite salads of all time is a southwest salad. After perusing on pinterest, it was decided- grilling a Chipotle Glazed Pork Tenderloin would satisfy my ingredient, craving, and budget needs. 


Doesn't that look delicious?

 Here are the ingredients I used for the glaze- I'm pretty sure you could get away with only using about four of them (chipotle peppers, brown sugar, ketchup and lime juice), but I had most of them in my kitchen already.
 I couldn't quite capture how beautiful the sauce looked- it was a deep red with these goldish tints in it- and little green flakes from the cilantro.. yummmmm!
 I had to give a shout-out for my immersion blender. I love this thing! I use it for smoothies, hummus, soup, and now chipotle glazes. It's definitely a non-necessity tool, but for $30, you won't regret it- you have my word. 
Now I know there are a lot of women my age out there who claim to hate pork. I don't why this is, but I think it's a hidden gem in the grocery store. It's a good source of protein, leaner than red meat, it's filling, and most of all it's so cheap! I got this whole tenderloin for $5.48 from Trader Joes- pretty impressive, right?

I like to pretend I have a grill by using this grill pan and getting sear marks when I'm cooking meat- definitely makes me feel a little fancier. The trick is to not turn the meat too much and to keep it on the pan a little longer then you think you should- it's not burning- just getting those nice lines!

I put the glaze on there as it baked and once I took it out, I had a beautiful smoky, spicy-yet-sweet pork tenderloin. Throw it on some baby spinach with roasted corn, feta, and sauteed zucchini and you have yourself a delicious well-balanced salad!

Oh and here's a song for today- it's been stuck in my head all day: http://www.youtube.com/watch?v=OpQFFLBMEPI

Ingredients for the pork tenderloin:
3-4 chipotle peppers + 1 tbsp adobo sauce (I used this can)
1.5 tbsp brown sugar
1 tbsp ketchup
1 tsp lime juice
1 tsp diced garlic
2 tbsp cilantro
1/2 tsp cumin
1 tsp salt
~1.25 pound pork tenderloin

Extra ingredients for the salad:
1.5 cups baby spinach
2 tbsp corn (I used Trader Joe's frozen roasted corn- which is delicious!)
2 tbsp sauteed zucchini (just toss it on a pan with olive oil salt and pepper)
1 tsp crumbled feta

Directions:
1) Blend peppers, brown sugar, ketchup, lime juice, garlic, cilantro, cumin and salt until smooth and there are no longer chunks of pepper in the sauce.
2) Trim fat off of pork tenderloin and cover in sauce. Refrigerate for a couple hours or overnight if time allows.
3) Sear pork tenderloin on grill or grill pan, if you have one available (if not, just bake a little longer). 
4) Finish pork tenderloin in the oven at 350 degrees for 15-20 minutes- adding glaze and turning tenderloin every five minutes. 
5) Allow tenderloin to sit for 10-15 minutes before cutting.
6) If tossing with a salad- toss it in your salad!
7) Enjoy!

Monday, March 18, 2013

Family Traditions

Growing up, I was a very lucky girl.

I have already talked a little about my grandmother (my mom's mom) in India. She was so talented - every time we visited her and my grandfather in Bombay she would make a feast for every meal. I always went back home a little rounder than when I had arrived. She went out of her way to make my brother and I feel at home. I can still hear her sticking up for me when I wanted a little more ghee on my rice and daal. I miss her hugs, the way she smelled, and how she always wore saris, even to sleep.

My mom learned a lot of what she knows about food from her mother, including an appreciation for Continental food, or Western cuisines. My Aji used to make traditional Indian food as well as German, Italian, and Chinese dishes and so much more. For years my mom has followed the example of her mother. She makes the best food I've ever tasted - check out her blog. Basically everything she makes is delicious.

I read this Buzzfeed article a few weeks ago that does a pretty good job of pinpointing a lot of my experiences as a kid. I was always the brown/Asian Disney princess, I usually had atypical lunches (but sometimes they were McDonalds and that was awesome), home remedies are still primary medical solutions in my house, and I will always have to decode my mom's hybrid language. But the last gif is undoubtedly true - I wouldn't change a thing.

Now here's why I was (and am) so lucky. Holidays are a big thing in my family. As a dual-religion household (Hinduism and Catholicism), we celebrate Christmas and Diwali, Easter and Ganpati, as well as lots of other holy days. But we also celebrate other cultural holidays in the best way we know how - through food. On the Chinese New Year we have fried rice and stir frys, during Hanukkah we have latkes, and on Thanksgiving we have a traditional turkey dinner with all the sides -- no Indian spices allowed as per my strict instructions. But one of my favorite traditions that we have is Irish stew on St. Patrick's Day. We usually have Soda Bread too, but a lack of ingredients (and my mom and I usually eating the entire loaf ourselves) led to only the stew this year. Still feels like St. Paddy's Day and tastes like tradition.

Shiny, shiny onions

Close-up of that seared meat

Best - and easiest - chicken broth

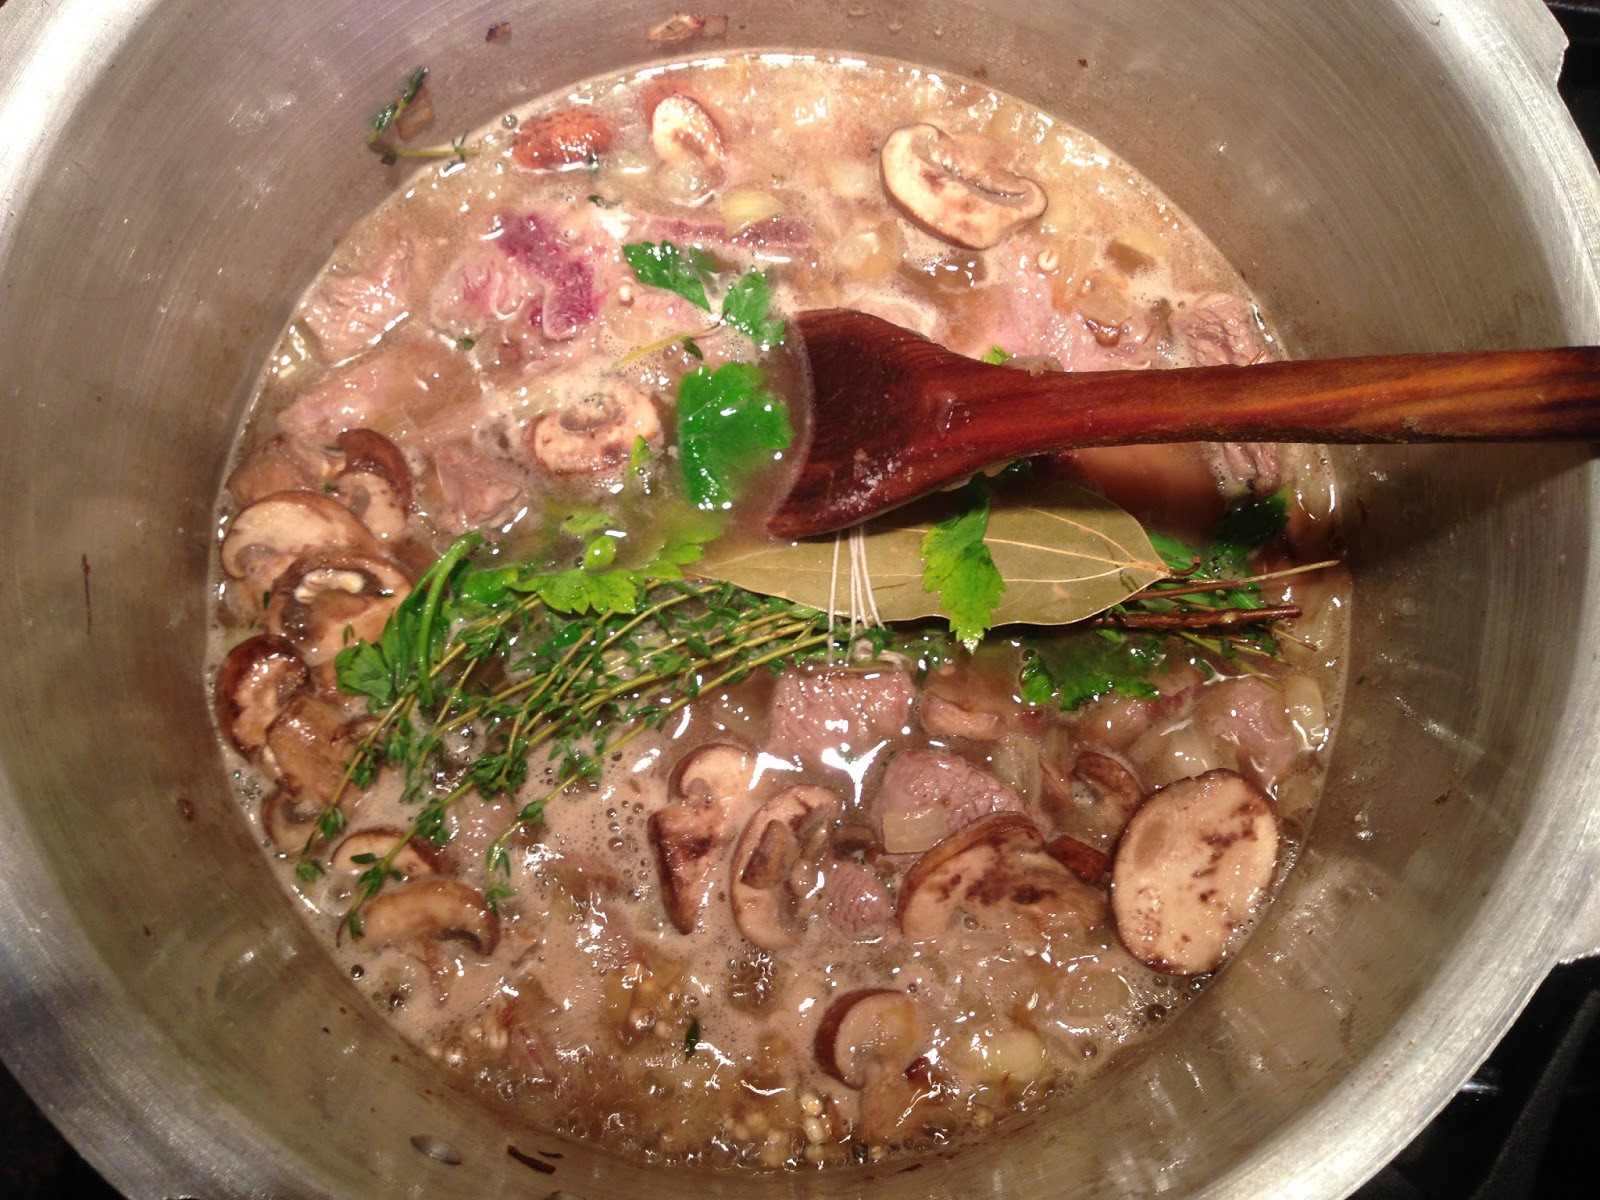
Bouquet of flowers? Bouquet garni!

Nestled bouquet before the lid goes on

My favorite vegetable

Magical pressure cooker, which is sometimes scary when the steam comes out


Irish Stew
Serves 4 (hungry) people

Ingredients:
1 lb. lamb shoulder
3 Tbsp. canola oil, for frying
1 medium onion, diced
3-4 sprigs of thyme
1/2 packet of portabella mushrooms, sliced
4 Tbsp. barley
3/4 cup pearl onions
2 cups chicken broth
1 1/2 tsp. kosher salt
1 bouquet garni (parsley, thyme, bay leaf)
1 large potato, thickly sliced
Handful of parsley, chopped
3 Tbsp. chives, chopped

** I used a pressure cooker because it cooks the meat faster, so my directions will follow that method. You can also cook the stew in a heavy-bottomed pot or saucepan, but the cook time will be much longer - about 2 hours. **

Steps:
1. Cut the lamb into chunks. You can leave some meat on a couple of the bones - it'll add flavor to the dish. 

2.  Heat the oil on a medium-high flame. Add the diced onions and cook, stirring often, until they are translucent. Then add the thyme.

3. Add the meat and stir. Get a good sear on all sides of the meat to lock in flavor. While it is browning, add the mushrooms and let them cook. Carrots are a great addition to the stew - I would've added them myself, but I was all out. Just cut them into chunks and add them in this step.

4. Once the meat and mushrooms have browned, add the barley and pearl onions. Stir to mix.

5. Add enough chicken broth to almost cover the meat. I like to use Trader Joe's chicken broth packets. They are a quick and easy substitute when you don't have homemade stock. Just follow the instructions on the packet. I poured 2 cups of water to cover the meat and then added the flavor packets directly into the pot.

6. Make the bouquet garni. Grab a handful of parsley and thyme and one bay leaf. Tie the whole bundle together with string and nestle it in the pot.

7. Add the potato and salt and stir to mix. Put the cover on the pressure cooker. **If using a regular pot, lower the flame and cover with a lid. Cook for 2 hours.**

8. Once the pressure cooker releases its steam, lower the flame and cook for 15 minutes.

9. Remove the lid and the bouquet. Garnish with parsley and chives and serve with rice or soda bread.

I find the best side for any Irish dish is, naturally, more potatoes.

And because this post is about my family and warm memories, here's one of my favorites: http://www.youtube.com/watch?v=NZtJWJe_K_w

Friday, March 8, 2013

The "Qui" to my Heart

I would definitely consider myself a foodie. Few things make me happier than a good meal. I am always looking to try new restaurants and cuisines, and the "Recipes" folder in my Bookmarks is by far the largest in there. But a love for food and cooking is in my blood. Like Nikita, I have lots of food lovers in my family. My aunt and grandmother were successful caterers in India. My uncle is Corporate Chef and partner of Nick & Sam's Steakhouse in Dallas, Texas. And of course there's my mother, the best cook I know and a huge influence on my culinary endeavors.

So since I am a "foodie," naturally I love watching cooking shows. I watch the occasional Giada or Ina Garten episode, but what I really love is Top Chef. I've been following the show for a few years now, including the spin-offs Just Desserts and Masters. But the original series will always be my favorite. I love all the challenges and am amazed by some of the dishes these chefs create. With the exception of this past season, my mom and I usually watch together and make guesses as to who we think will be voted off that week.

The last season we watched together was the ninth with Paul Qui as the winning chef. Even early on in the season we knew he was going to win and he easily became our favorite chef. At the time he was executive chef at Uchiko and ran the East Side Kings food trucks, both in Austin, TX. Coincidentally, right in the middle of the Top Chef season, my family headed to Austin to visit my uncle, aunt, and cousin. Once we were there I immediately gushed about my new favorite chef to my aunt and we made a reservation for Uchiko. That meal was absolutely one of the best I have had in my life. We ordered most of the menu and everything - from the service to the food to the desserts - was amazing. 

Sadly my only picture of the night - the hot rock "sear it yourself" wagyu beef. 

I need to plan another trip to Austin because Paul Qui is opening up his own restaurant, qui. I. Can't. Wait. 

Last night, while flipping through Tyson Cole's Uchi cookbook, I found a great looking appetizer. Cole is the creator of Uchi and Uchiko and is Qui's mentor. His recipes are usually very complicated - they have so many layers and components - but I happened to have most of these ingredients so I thought I'd give it a try. I did make some substitutions and altered the amounts a little, so this is my version of his Mame Yaki.

 Kimchee base ingredients - clockwise from bottom right: leeks, ginger, garlic, shallot

 Be careful not to burn the garlic!

Peas with the homemade chile oil

It's important to get a good sear - if you feel like some of the smaller ones are cooked, put them in a bowl while the larger peas continue to cook


Spicy Peas with Kimchee
Serves 4 people

Ingredients:
Kimchee base
1 tsp. grated ginger
2 garlic cloves, sliced paper thin
1 shallot, sliced into thin rounds
1/2 cup leeks, sliced into thin rounds (or green onions)
1 Tbsp. canola oil
3 tsp. sesame oil
1 1/2 tsp. sugar
1/2 tsp. red pepper flakes
3 Tbsp. fish sauce
Salt to taste
Spicy English Peas
1/4 lb. whole peas (in the pod)
Drizzle of canola oil
Drizzle of chile oil (I made my own with Sriracha and canola oil) 
Kosher salt and fresh ground black pepper to taste

Steps:
1. Heat a saucepan on medium-high heat and add canola oil. 
2. When the oil is near smoking, add the ingredients and cook one at a time for 1 minute each in this order: shallot, garlic, ginger, and leeks. Adjust heat as necessary to prevent burning. 
3. Keep moving the ingredients around. Add sesame oil and sugar. Stir until sugar dissolves. 
4. Add red pepper flakes and remove pan from the heat. Add the fish sauce and salt. Set aside in a bowl. 
5. Clean the stems of the peas - make sure any dried leaves are removed. 
6. Heat canola oil in a grill pan on medium-high heat. The original recipe calls for cooking the peas on a gas grill. If you have access to one, go for it - that smoky flavor would be a great addition.
7. Add the peas and drizzle with the chile oil. Saute for about 10-15 minutes until the peas have a nice char and are all fully cooked. Add salt and pepper. 
8. Transfer peas to a bowl and top with the kimchee base. Stir to coat all the peas and serve.

These peas are a great substitution for edamame - and you eat them the same way!

Wednesday, March 6, 2013

One pot- All Veggie Wonder

Gosh I don't even know how to start off this post because I have so many things to say. Should I start with telling you that I had such a wonderful day because we had a snow day- From work?! I didn't even know snow days existed in the real world. Or should I start with explaining what the title of the post is all about? Or.. should I start out commenting on how amazing Shauna's first post was? That girl can write!

Well I guess I've already pretty much said all I can say about the snow day and Shauna, so I'll explain the title. The title is a little shout-out for two of my favorite post-college friends, Emily and Chelsey Barrios. I have had the amazing opportunity to work and become friends with these two wonderful sisters in my first real, post-college job. My first year was with Emily, and then, when she went on to bigger and better things, her sister replaced her in our office. While there are many great things I could say about them, one of my favorites is the fact that like me, they both love to cook,and thus we have all cooked together many, many times! And while the three of us have cooked many a fancy meal, when it's getting late and we don't want to cook anything that requires a lot of clean-up, one of their favorite sayings is "Let's make a 'one pot, one hit wonder!'" And so- on this lazy, surprise of a relaxing day, I needed a low-maintenance sustenance dish- and so I went for a one hit wonder- Broccoli Slaw pasta. 

To be honest, I saw this recipe on food-network probably about two years ago. Since then, I've bought the ingredients twice, and twice let the broccoli slaw go bad in my refrigerator. I'm sorry, but "Broccoli Slaw Pasta" sounds good in theory, until you're hungry at night and then having a bowl full of broccoli slaw does not sound that satisfying! But, last weekend I bought the ingredients once again and since I had this day to relax, I decided to give it a try. And now, two years later, I can honestly say it is both really delicious AND satisfying- IF you add the right ingredients! 

First of all- what was I listening to? "Falling Slowly" from the Broadway play "Once." http://www.youtube.com/watch?v=4LGavEmg6Xs I saw it about a month ago in NYC and it was so great. I'm a sucker for musicals and I listened to a lot of that today as I relaxed at home. Anyways, here's the picture break-down of my cooking:

I decided to make the slaw more appetizing by adding two of my favorite pasta additions- mushrooms and zucchini.
I don't know about you, but every time I cook mushrooms I think- "man, these are still so dry- I need to add more olive oil!" But, I've learned my lesson- don't do it! Mushrooms soak up olive oil at first and then release it- so add those 2 tablespoons and let them do their thing!
See- they eventually get soft and cooked through and delicious!
Can you believe that's boxed creamy tomato soup? It is! Just add oregano, onion powder, chili flakes, and garlic powder and you have a beautiful pasta sauce.

 Yumm.. add the mushrooms and zucchini and you're done with the sauce! My roommate even came out and said "It smells like you're cooking something delicious and creamy". And while it's true that I am, that creamy tomato soup actually only has 150 calories- for all of that sauce! 
 I moved the pasta sauce to a tupperware, rinsed the pan and added the slaw and a little olive oil.
Once it was cooked, I added the sauce and some parmesan cheese!
And there you have it- Broccoli Slaw Pasta! Actually delicious- who knew?! While I wish I could claim it tastes just like pasta- I'm not going to lie to you- it doesn't. But this dish is delicious and it's a good substitue if you're looking for a hearty and healthy meal.
One pot- one hit wonder! Look at how few dishes I had to do!!


Ingredients:
3 tbsp olive oil
1 tbsp garlic paste or diced garlic
1/2 lb sliced portobello mushrooms
1 zucchini (thinly sliced)
1 tsp fresh ground pepper
1 tsp salt
1 can (12oz) creamy tomato soup (I used 1/3 of Trader Joe's creamy tomato soup box)
1/2 tsp onion powder
1 tsp dried oregano
1/2 tsp chili flakes
1/2 tsp garlic powder
1 bag (12oz) broccoli slaw
1/4 cup water
1 tbsp grated parmesan cheese

Directions:
1) Add 2 tbsp olive oil to a saute pan with 1 tbsp garlic paste or diced garlic. Saute until slightly browned.
2) Add in the sliced portobello mushrooms, zucchini, pepper and salt. Saute until vegetables are soft and cooked through. (About 4 minutes)
3) Remove veggies from pan (I put them into the tupperware I would use to store the final product!)
4) Pour can (or box) of tomato soup into the pan and simmer. Add onion powder, oregano, chili flakes and garlic powder.
5) Add cooked veggies back to the pan and cook for 3 minutes. Then return veggies and sauce to tupperware or bowl.
6) Rinse pan and add 1 tbsp of olive oil, 1/4 cup water, and package of broccoli slaw.
8) Once water has evaporated and slaw is soft, but not mushy (about 8 minutes), add sauce back to pan.
9) Toss with parmesan cheese and serve!

Tuesday, March 5, 2013

Childhood Treats

I'm so glad Nikita decided to bring me in on this adventure. We've shared so much of our lives already, it only makes sense to take this blog on together too!

As she explained, we've been friends for quite a few years. Before our long distance relationship began, Nikita lived on Long Island, which is where I live now. We didn't live far apart and since our moms are BFFs we got to hang out pretty often. We would play Power Rangers, reenact Disney movies, and make mud pies. Ya know, normal stuff for 90's kids. I would go over to her house once a week for piano lessons, and when her older brother, Stan, had his lesson we would watch Rugrats with the volume down really low because I wasn't allowed to watch it at my house. We went to summer camp together, had countless sleepovers, and went to nursery school together (even though Nikita was a grade below me). We basically did everything together - including vacations.

We've been lucky enough to travel to a lot of places together, but the trips that I really hold close to my heart are the ones we took when we were younger. Growing up, our parents had a close group of Indian friends, many of whom had kids around our age. They planned so many trips to Splish Splash, Sesame Place, Lake George, Vermont, and much more. Every place was within driving distance, so once the day came each family would pack into their respective cars, drive to a meeting point, and caravan to our destination. Be it a day or weekend trip the cars would be full, forcing us to cross our legs because of some cooler/tote/food on the car floor. And we knew that if we wanted a snack (car rides make you hungry, you can't blame a kid) we would be met with the response, "There's a kheema dog in that bag."

What is a kheema dog, you ask? Good question. Kheema is an Indian meat dish of ground beef or lamb mixed with lots of spices. It's usually eaten with rice or rotis, but for our road trips its vehicle was the hot dog bun. As children we devoured them. Nothing hit the spot after a morning of water rides quite like a kheema dog. Unfortunately, after so many years, it is hard for me to eat a kheema dog. I think I overdosed on them. Nikita, however, loves kheema and loves kheema dogs so I figured a great first contribution to this blog would be this childhood snack.

Now on these road trips (and every other time we sat in the car) we listened to this one tape of children's songs. It was our favorite and was unfortunately lost a long time ago. This: http://www.youtube.com/watch?v=pJhcGepfG04 was one of our favorites on that tape and because of that we thought that "Ob-La-Di, Ob-La-Da" by the Beatles was a children's song. For several years. Whoops..

Memoriesss, all alone in the moon-- I'll stop there.

I'm gonna do what Nikita did in her first post and share some step-by-step pictures first with the recipe to follow. Because I live at home I have access to a lot of these specialty ingredients. But if you can, you should invest in some of these ingredients! They add a great flavor to anything.

 Browning onions!

Look at all that water!

Goodbye water

Almost there..


Kheema Dogs
Fills 6-8 Hot Dog buns

Ingredients:
1 lb. ground beef or lamb
2 Tbsp. canola oil
1 medium onion, diced
1 Tbsp. garlic paste (or minced garlic)
1 tsp. chili powder
1/4 tsp. turmeric powder
1 tsp. garam masala
1 tsp. roasted ground cumin powder (or regular)
1 1/2 tsp. kosher salt
1 packet of hot dog buns

Steps:
1. Heat the oil in a saucepan on a medium flame. Add the onions and saute until they are browned.
2. Add the garlic paste and stir.
3. Add the ground beef and stir to mix with the onions.
4. Let the meat brown for about 10 minutes. Break up the big chunks with your spoon - you want small pieces so they fit inside the bun.
5. The meat lets out a lot of water when it cooks so now you want to let that evaporate out. Just keep the kheema on a medium-high flame, stirring often to prevent any sticking. This should take about 5 minutes.
6. Once most of the liquid has disappeared, add all of the spices - chili powder, turmeric powder, garam masala, cumin powder, and salt. Mix well.
7. Add about a 1/2 cup of water, cover the pan, and cook for another 5 minutes.
8. After 5 minutes, turn the flame off and spoon the kheema into a hot dog bun.

Enjoy!


Monday, March 4, 2013

So that didn't last long..


Less than 24 hours since my blog went live, I've decided to change the concept. I'm not usually indecisive, but I did kind of start this thing on an impulse, so naturally there's going to be some bumpy ground before we get going. If you liked the first post, don't worry, posts like that will continue to come, but get ready... because things are about to get a lot better!

Introducing, my best friend, Shauna Gonsalves. Shauna and I have been friends since we were babies, with our story actually starting long before we were born in the beautiful friendship of our mothers. While I'm sure this long, beautiful, sappy story will one day be told on here, this is not the time. I'll keep it short. Shauna and I have been long distance friends for 16 years. That's right- 16! From writing Lisa Frank sticker-covered letters- to weekly hour long phone conversations, our friendship has somehow managed to not only survive, but also to grow stronger every year. She's the sister I never had and the friend I can go to about anything and everything. And so, it only makes sense to do this with her as well. I don't have access to a lot of my baby pics, so this will have to do for now. Here's a picture of me, my brother Stan, my cousin Sam, and Shauna from childhood to adulthood (okay maybe semi-adulthood).


Shauna, like me, grew up in the kitchen. Her mom is also an absolutely amazing cook and you can find  some of her delicious recipes at http://homeonmyrange.blogspot.com/. Shauna and I have been cooking together for family meals for as long as I can remember and now we'll try to share some of those recipes and memories with you. Like I said, we don't live in the same place, so we'll both be blogging from our respective homes and we'll try to blog together whenever we have the opportunity to be in the same place (which we try to make happen every couple of months at least).

Okay, that's enough explanation for now. While I don't have a recipe to share today, in celebration of this new blog concept, I'll show you some pictures of one of the last things Shauna and I baked together.

Shauna came to visit me in DC last year and I took her to a 4th of July BBQ one of my friends was having. For all of you on pinterest, I'm sure you've seen the American Flag Cake and wondered if it's really possible. Shauna and I wondered the same and decided to accept that challenge. We followed the directions on this site: http://www.glorioustreats.com/2011/06/4th-of-july-flag-cake.html using simple boxed funfetti cake mix (the best) and food coloring. Here's what we came up with:

Shauna came up with this easy way to ice fireworks on the top of the cake- you simply draw circles in alternating colors and then use a knife tip to pull the icing to and away from the center. So quick and so easy!

Side view!


And there you go- it is possible! It takes patience and a whole lot of icing but I say it's a great 4th of July tradition. 

Oh- and as for a song for this recipe- I'm going to go with a funny/embarassing Shauna/Nikita memory. One summer day back in middle school Shauna and I spent hours in my room playing and replaying Usher's "Confessions" because we for some reason believed we needed to know every word. Here's a throwback for you: http://www.youtube.com/watch?v=5Sy19X0xxrM

That's it for now. Hopefully Shauna will blog soon so you can see what she can do! :)

Welcome to Beats, Treats and Eats!

Let's keep it short and simple. I love listening to music. I love to bake. And I love to cook. And so, at this time of my life, 6 months before I transition from a life of working 40-hours-a-week, to a life of being a PhD graduate student, I'm taking time to pursue those loves.

So the concept- as for now there is no super exciting, unique sell for this blog. But this is me- I grew up in a house of foodies- a mom who can cook any cuisine under the sun amazingly well- a brother who went to the Culinary Institute of America and is an executive chef in Dallas- and my father and me- happy taste-testers who also enjoy taking a stab at different cuisines in the kitchen. Now I live away from my family in DC, a city I can barely afford to live in, and I cook in a tiny kitchen without all the gadgets that I took for granted back home. So that's what you'll see here- me exploring different recipes, while mostly sticking to the basic ingredients I can afford and to common kitchen amenities the 20-somethings keep in their limited cabinet space. Oh and the beats? I like cooking to music, so I'll let you know what song could be heard from my kitchen while cooking.

Okay- that's enough for now- let's get to a recipe! I attended a Vandy alumni dinner tonight and I brought a dessert. Specifically, homemade samoas! I missed the girl scout cookie ordering this year, so I thought I'd take a stab at it myself.

Pretty good right?!

So first- what was I listening to? Ra Ra Riot's "Dance with Me" (http://www.youtube.com/watch?v=zp8CqqY-OYg) I recently saw them in concert and they were amaaaazing! And I'm celebrating today- just finished a month of grad school interviews so I definitely feel like dancing.

I'm going to walk you through the steps through pictures, but if you scroll to the bottom you can get the recipe and step-by-step directions.

So first I made the shortbread batter. Rolled it out and cut it into cookies.

While most recipes call for a doughnut cookie cutter, I found a good stein works just as well:
I took the cookies out when they were just slightly browned on the edges. The caramel topping gets pretty hard, so you want the cookie to still be soft. 
I maybe burned the coconut a little. You really have to keep your eye on that stuff! This was after 6 minutes. It still tasted good, but I had to pick out the burnt pieces.

One kitchen indulgence I do have is a double-boiler. I use it a lot though so I think it's worth it. Also secret tip- you can use the bottom pot as a regular pot- who would've thought?

I know typical samoas have a middle circle cut-out, but I figured it wasn't worth the effort. Go for it if you have the patience!

Yummmmmm..
They were a big hit at the party and tasted as good as (if not better than) the real things! :)

Homemade Samoas

How many: 24 cookies

Ingredients:
Cookie dough:
1/2 cup butter
1/4 cup sugar
1 cup all-purpose flour
1/8 teaspoon baking powder
1/4 teaspoon salt
1 teaspoon milk
1/4 teaspoon vanilla extra
Coconut/Caramel Topping:
8 ounces soft caramels (I used Brach's Milk Maid Caramels)
2 tablespoons milk
1/3 teaspoon salt
2 cups shredded sweetened coconut
Chocolate dipping:
5 ounces semi-sweet chocolate

Steps:

Shortbread Cookies:
1) If you're lucky enough to have a stand mixer, cream the butter and sugar together. I unfortunately don't have one of those bad boys (they take up so much space!) So I found, if you let the butter sit out long enough, a fork works just as well.
2) In a separate bowl, combine the flour, baking powder and salt. Slowly add the mixture to the creamed butter. Add the milk and vanilla extract. I'm not sure how easy this would be in a stand mixer, but when doing it by hand, I used a fork at first and then eventually had to resort to my hands to fully incorporate all the ingredients and form a dough.
3) Separate the dough into two disks, wrap them in plastic wrap and refrigerate them for about 45 minutes.
4) While the dough is chilling, preheat the oven to 350 degrees Fahrenheit.
5) If you have parchment paper, line your baking sheet with that, but I find that stuff a little expensive, and a lightly buttered pan works just as well. Lay the cookies out on the tray with at least 1/2 an inch between cookies.
 6) Once the dough is chilled, take one disk out and roll it onto a lightly floured surface till it's about 1/8-inch thick. Cut out as many cookies as possible using a cookie cutter if you have it, or a cup works just as well (as pictured above). My cookies were about 2 inches wide, but you could make them bigger if you wanted. If the cookie dough gets too soft, refrigerate it again and get the other disk. I switched back and forth between disks until I had 24 cookies cut out.
7) Bake the cookies for 8-10 minutes, the thinner you rolled your cookies the less time you'll need to bake them so keep an eye on them. You want them kind of soft to balance out the caramel and so they don't break in half when you're pushing the topping onto them. 
8) Transfer the cookies to a wire wrack to cool. If you don't have a wire rack, a cool tray or plate works just as well.

Coconut topping:
1) Spread the coconut flakes onto a baking sheet (no need to butter it or line it). Bake at 350 degrees until toasted. I set a timer and checked the coconut every 2 minutes because that stuff browns quickly!
2) Melt the caramels, milk and salt in a double boiler. Remove from heat and stir in toasted coconut. (I did this in two batches, so I didn't have to rush topping the cookies before the caramel hardened.)
3) Using a spoon, spread caramel and coconut topping on the cookies and let them harden. 
4) Melt the chocolate in a double-broiler. I used a spatula to spread the chocolate on the bottom of the cookies, you can also try dipping, but I found that more difficult. If you have wax-paper, you can lay the dipped cookies onto that, but if not, I just flipped the cookies upside down (chocolate side up) and let them harden that way.
5) Once the bottoms have hardened, flip them over and drizzle the remaining chocolate on top and you're done!
6) Enjoy!