Saturday, June 22, 2013

Meat Sauce Bolognese


A few days ago I really felt like making Italian food. This isn't a weird feeling for me, I love love love all Italian food, and the more often I get to eat it the better. But I decided to make it this week because my mom is out of town. She's in San Francisco with my aunt and uncle anxiously awaiting the arrival of the newest addition to our family! And while she's there she gets to hang out with this little nugget 


who is going to be a big sister very soon. Now don't get me wrong, I love my mom, but sometimes when she goes away it feels a lot like this. But I also miss her a lot and I know my dad and brother do, too. It's only been a few days, but the house looks and feels a little (okay, a lot) emptier.

Before she left, since she's amazing, my mom cooked enough food to feed the three of us for 2 solid weeks. It only took her 2 days to make everything. Yeah, I feel unaccomplished. But before we start on what she made, I thought I'd make something of my own. Lidia's Italian-American Kitchen has a bunch of really great recipes, so I decided on a bolognese sauce. It is absolutely one of my favorite types of sauces. And it's really easy to make, which is great when my mom is out of town because I don't have to call her a bunch of times with questions like where is that thing we used that time we made those things for brunch (she'd know exactly what I'm talking about, too)?

Unfortunately, while the sauce was cooking I ate some grapes. Normally that would be fine, I love grapes. But these must have been demon grapes or something because about half an hour after eating them I got so sick and was doubled over because it felt like someone was punching me in the gut. No one has ever punched me in the gut (does getting kicked into the corner of the couch by my brother count?) but I imagine that is what it would feel like. So my dream of having a nice family dinner with meat sauce and garlic bread was trashed. Instead I got to watch my dad and brother inhale multiple helpings. They ate all the garlic bread so maybe it was a good thing I couldn't eat. But that's okay, because there's nothing like watching someone enjoy a meal that you've made for them.

It took me half an hour to cut this. I greatly underestimated my chopping skills. 

WINE. This is also a great wine for drinking. I never know what a dry wine is, so I just open anything and it always tastes great. 

I really love mixing different ground meats together. I am usually a fan of substituting turkey, but for this dish the original meats are way better. The fattiness of the beef and pork amplify the flavor of the sauce so why would you want to deprive your tastebuds of that goodness?

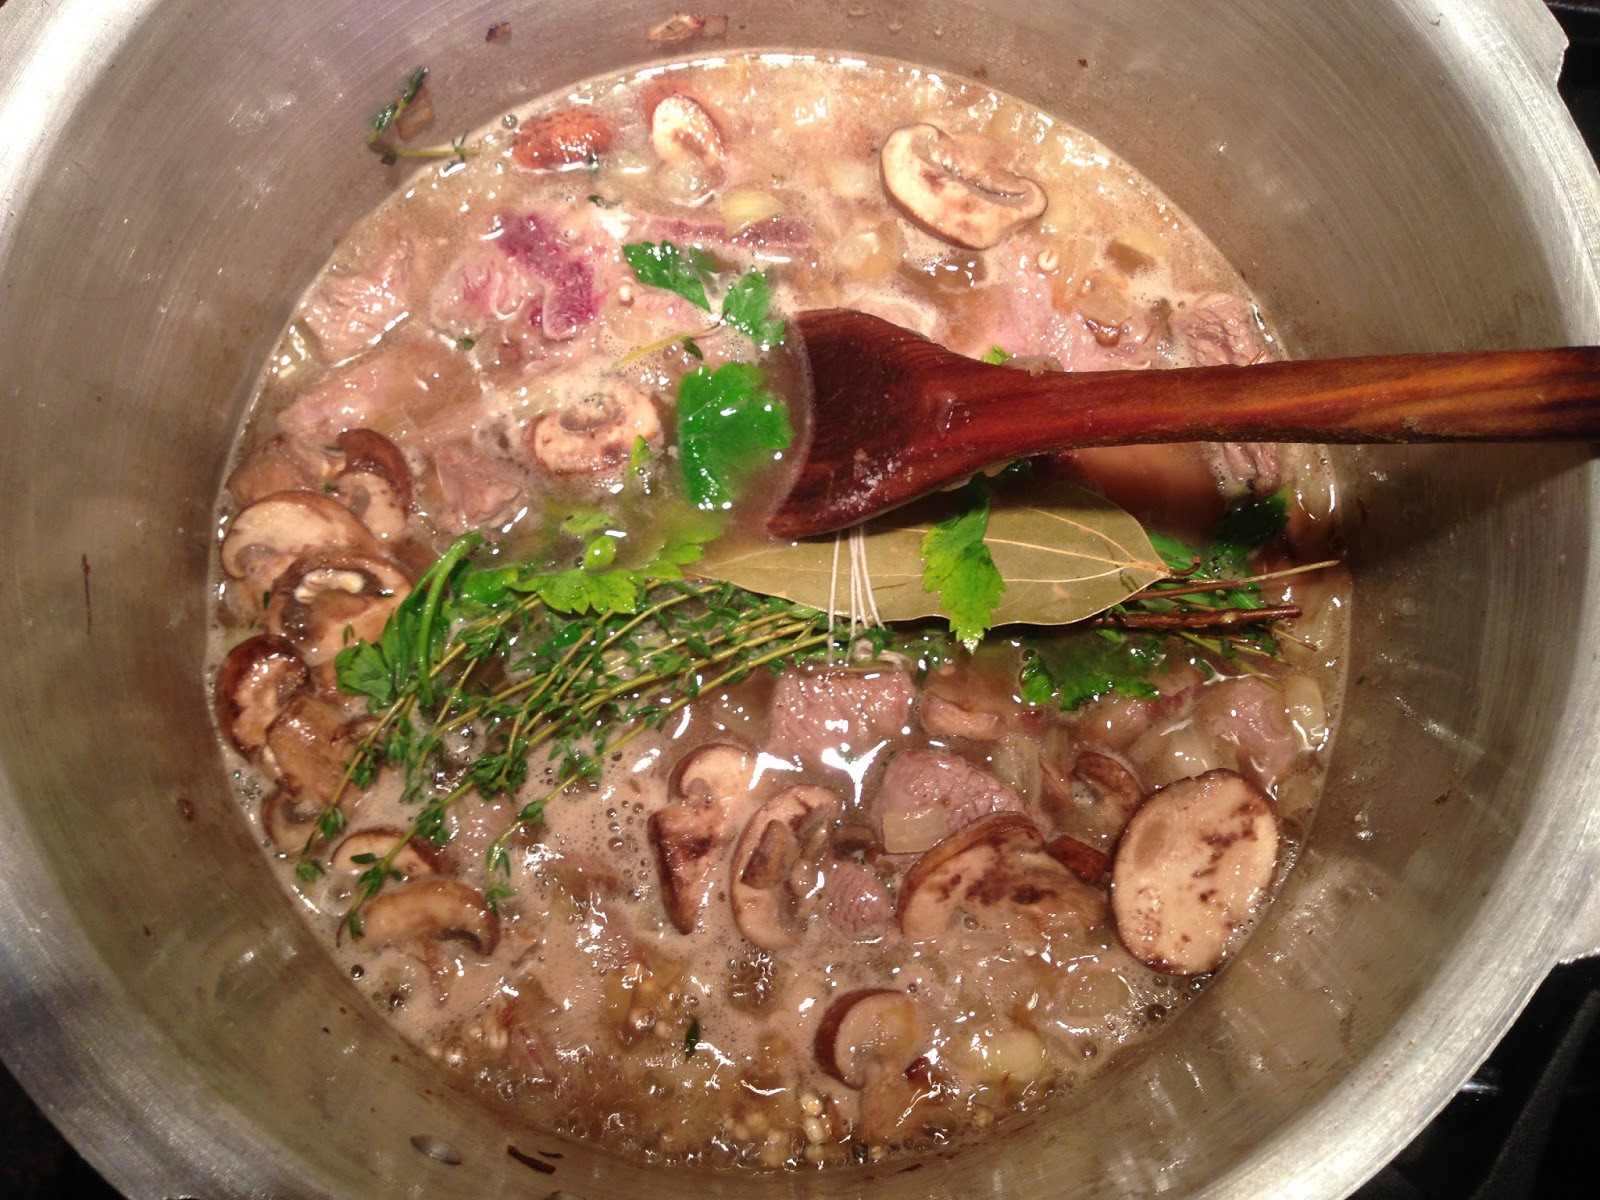
Post-wine. I actually started the sauce in a non-stick pot, but I switched to a stainless steel one before adding the meat. One of the best parts of the sauce is scraping up the browned bits of meat at the bottom, and that doesn't happen on a non-stick surface. 

You can also use San Marzano canned Italian plum tomatoes. They have a great flavor and I probably would've used them if I had them. 

See you in 3+ hours.

Meat Sauce Bolognese
Serves 6 

Ingredients:
3 Tbsp. extra-virgin olive oil
1 medium onion, diced
1-2 celery stalks, finely chopped
1 medium carrot, peeled and finely chopped
4 garlic cloves, peeled and crushed
1 lb. ground beef
1 lb. ground pork
1/2 cup red wine
1 Tbsp. tomato paste
28-oz. can crushed tomatoes
3 bay leaves
2 tsp. chopped fresh thyme (dried oregano is also great)
Water as needed
Kosher salt
Fresh ground pepper

Steps:
1. Heat olive oil in a heavy bottomed pot on medium heat.
2. Add the onion, celery, carrot, and garlic. Cook while stirring until the onion is translucent, about 3-4 minutes. Season lightly with salt. **It's always best to underseason now and make up for it later.**
3. Stir in the beef and pork and break it up using the spoon. Cook until the liquid the meat gives off evaporates, about 10-15 minutes. Make sure you really brown the meat.
4. Add the wine and scrape the bottom of the pan. Stir in the tomato paste and cook for 2-3 minutes.
5. Pour in the tomatoes and add the bay leaves and thyme (or other herbs). Season with salt and pepper.
6. Bring the sauce to a boil and then lower the heat so it sits at a simmer. Let the sauce cook for 2-3 hours, the longer the better (in my opinion this is the hardest part). Add water periodically to keep the meat and vegetables covered. Give it a stir eery half hour. Some people like to skim the oil off the top of the sauce. But I just reincorporate it because that adds to its deliciousness.

Boil some pasta, grab some garlic bread and parmesan cheese, and enjoy.

Tuesday, June 11, 2013

Beans, Beans, They're Good For Your Heart

I love beans. Love 'em. Baked beans, fava beans, black-eyed peas (I had to check, but they're totally beans), chickpeas (which are also beans, damnit, why are all these peas beans), you see where I'm going with this.

And I already talked about how much I love Mexican food in my last post. I have spent a considerable amount of time researching the place(s) to go for wonderful (cheap) tacos. One of my favorites in NYC is Tacos y Quesadillas. It's a cart, but it has consistently been awesome every time I've gone. The hot sauce is *~hot~* so watch out, but it's perfect with the less spicy huaraches or carnitas taco. Also, on the last two trips I made to DC I had tacos. One time was Korean tacos but whatever they're still delicious.

ANYWAY, I digress, we were talking about beans. So the other day the weather was really gross and rainy so I wanted to make something warm and hearty. Like a chowder (pronounced "chowdah").  But since my mom had marinated an ancho chile-rubbed pork tenderloin, I decided on this super easy Rick Bayless recipe for Mexican Beans with Chorizo and Greens.  I've made it before and it was really great. The last time I used extra chipotle chiles because there were only a couple left and what was I gonna do with 2 tiny chipotles, but it was super spicy so I decided to (mostly) stick to the recipe this time. Both times I've made it I didn't use chorizo and just made a vegetarian version instead. I'm sure the chorizo adds a whole new level to this dish, but it's still really good without it.

I love garlic so much so I usually add more than the recipe calls for. It's never a bad decision.


The recipe actually calls for the chiles to be seeded. I've tried that before and it was a HUGE pain. Look at these things. And there are SO MANY seeds. They definitely contribute to the spice of the chiles, so if you're worried about spiciness try adding one chile at first, then tasting and adjusting the level after the beans have simmered. 


BEANS. Definitely be sure to drain AND rinse them!


Funny how these black beans are actually all different colors.. 


This is NEW from Trader Joe's. Instead of buying a huge bunch of Swiss chard this packet is a big time saver and is ideal when you can't get really great Swiss chard. TJ's also has a kale version of this. I recommend both. 


Microwave-ready Swiss chard


It shrinks to about a third of the size. If you love greens you can always add more. You can also use spinach if Swiss chard isn't your thing. But who doesn't love Swiss chard? If you don't, get out. 


 You can serve this as a side dish or over rice. I would add some tostones for good measure.


Mexican Beans with Greens (haha rhyming)
Serves 4-5 people

Ingredients:
1 medium onion, diced
4-5 garlic cloves, sliced
2 15-oz cans black beans (or kidney beans), drained and rinsed
1 or 2 canned chipotle chiles en adobo, stemmed and finely chopped
3-4 cups Swiss chard, sliced
Crumbled feta (or queso fresco if you're lucky), for garnish
Canola oil
Salt to taste

Steps:
1. Heat a little oil in a medium-sized pot over medium heat.
2. Saute the onion until browned and add the garlic.
3. Stir for about a minute and then add the beans, chiles, and 1 1/2 cups water.
4. Let the beans simmer for about 10 minutes. Meanwhile, put the Swiss chard in a microwave safe bowl, cover with plastic wrap, and poke a few holes in the top. Microwave for 3 minutes, until it wilts.
5. Add the microwaved greens to the beans and stir. Season with salt to taste.
6. Serve and garnish with feta.


Tuesday, May 7, 2013

Chipotle Meatballs

I really love Mexican food. Don't get me wrong, I love all Latin food (that I've tried), but Mexican food is definitely a winner. Not a huge fan of Tex-Mex. But hand me a plate of cochinita pibil and I'm a happy girl. Part of the reason I love going to Austin so much (besides seeing my wonderful family, duh) is for really authentic Mexican food. The last time I visited my aunt and uncle, they took us to Azul Tequila, a really great restaurant where the food was just amazing. Of course I had the cochinita pibil, and I was not disappointed.

Sadly, my options for authentic (and relatively cheap) Mexican food are limited up North. So when I get a craving, I turn to Rick Bayless. This guy definitely knows his Mexican cuisine - his recipes and directions are straightforward and foolproof, and he usually provides suggestions for alternative ingredients, methods of cooking, etc. Bayless is based in Chicago with three main restaurants and two "fast-food" locales in O'Hare (Chicago's airport) and the Macy's on State Street. A couple years ago Nikita and I took a trip to Chicago with our moms. We actually went to see the Glee concert, which was pretty awesome - especially when my mom gasped when Artie (the character in the wheelchair) stands up during a song. She didn't realize he wasn't actually permanently in the chair. That he's just an actor. Playing a character. Oh, Mom. Anyway, the highlight of the trip was hands down our dinner at Frontera Grill. A close second was lunch at the Frontera Fresco in Macy's. It took a while to find, but was definitely worth it. Honestly, two of the best places I've ever eaten in my life.

One of my favorite Rick Bayless recipes is from his book Mexican Everyday. These chipotle meatballs are really easy to make and they turn out great. The original recipe calls for ground pork, which is what I usually use, but this time I opted for turkey - because that's what was in the freezer. You can adjust the spiciness of the dish by removing the seeds of the chipotles. The seeds really pack the heat, so if you want less of that you can take them out. However, removing the seeds of canned chipotles can be extremely tedious - if you want less heat, just try using fewer chilies.

Chipotle Meatballs
Makes 16-18 meatballs

Ingredients:
3 slices bacon, cut into 1-inch pieces
3 garlic cloves
2 eggs
1/2 cup breadcrumbs (3/4 cup if you're using panko like I did)
Kosher salt
1 1/4 lbs. ground pork (or turkey, beef, lamb)
1/2 cup coarsely chopped mint leaves
28-oz can fire-roasted diced tomatoes
1 to 2 chipotle chiles en adobo (canned), stemmed and seeded (leave the seeds in for spicier flavors)
1 to 2 Tbsps. chipotle canning sauce
1 tsp. dried Mexican oregano (or regular)

Steps:
1. Preheat the oven to 450 degrees.
2. In a food processor, combine bacon and 1 garlic clove until finely chopped.


3. Add the eggs, breadcrumbs, and 1 teaspoon kosher salt. Pulse to combine.


4. Then add the pork and mint and mix until everything is combined, but not into a paste.


**Take out the blade from the food processor.**


5. Form the meat into 16-18 spheres. The smaller the size, the more you'll have. Space them out in a large baking dish. You can lightly grease the dish with an oil spray, but the fat from both the bacon and the meat should be enough to prevent any major sticking.


6. Bake until lightly browned without turning, about 15-20 minutes depending on the size of the meatballs.

7. While the meatballs are baking, clean the food processor and combine the tomatoes and their juice, chipotles, canning sauce, oregano, 2 garlic cloves (halved), and 1/2 teaspoon kosher salt. Process until pureed.


8. When the meatballs are done, pour on the tomato puree, evenly covering the dish. Bake uncovered for about 15-20 minutes.


I love this recipe because it's fast, delicious, and has an easy cleanup! I really like that it's also versatile and can be made a variety of ways. I decided to serve these meatballs with white rice and red beans with swiss chard, my riff on a Mexican Everyday recipe. A great (spicy!) combination!


Since I mentioned them earlier, it would make sense to leave you with a song from Glee, but this latest season has really turned me off from the show. No, Ryan Murphy, I would not like you to watch you cram every experience in this world into a show about a high school glee club. So instead I'll leave you with one of my favorite songs from one of my favorite bands: http://www.youtube.com/watch?v=-4pjrmH967c Can't wait to (hopefully) (maybe) see them at Governor's Ball this summer!

Wednesday, April 24, 2013

Everything's Bigger in Texas - Including my Stomach

The last few weeks have been incredibly hectic. I have assembled approximately 9 pieces of furniture (and accumulated 9 Allen wrenches in the process), painted (some of) said furniture, hosted a dinner party, re-celebrated being Irish (which I am.. not), and spent a great week in Texas visiting family and celebrating the marriage of one of my childhood friends (and Nikita's older brother), Stan.

My trip to Texas was exciting for so many reasons. Those reasons mainly revolve around food. The first night in Dallas we started off at Nick & Sam's, the steakhouse where my uncle is the Corporate Chef. My mom, my aunt Lori, and I were treated to plates of amazing food from their new Omi beef from Japan to deep-fried Kung Pao lobster. Then it was off to Nobu Dallas where we had pretty much everything from their toro to their miso cod lettuce wraps to a King crab leg with truffles. Life is good when your uncle's a chef.

The first few days of the trip were some of my favorites because I was able to spend time with my little cousins. Mia and Cole remind me so much of my little brother and me - except they are way nicer to each other. I have really loved watching them grow up (thank you technology and Apple) and can't wait to see them again. Those days with my family were naturally centered around food. We snacked on truffle burgers and parmesan fries after a morning at the Dallas Museum of Art, had bahn mis from Ba Le in Garland, ate sous-vide fried chicken made by my talented aunt, and of course we couldn't resist:

Most important food stop? I think so.
That week in Dallas was also Wedding Week - bridal shower, bachelorette (and bachelor) party, and wedding all in the same week! It was so great to be a part of all the festivities and (duh) the food was amazing too. The maid of honor laid out a fantastic spread at the shower with quiches, kolaches, and bundt cakes. The bachelorette party dinner at Hattie's was delicious and sated the Southern girl in me. And instead of a groom's cake at the wedding, they had pies. Need I say more?

After eating out so much you start to miss home-cooked food. Although I'll miss the BBQ and tacos, few things warm my heart like a good Italian meal. While my mother opts for a more Indian route, I bypass my usual go-to sausage and pork ragu for another favorite.

Risotto is a really wonderful dish. It takes time and patience and love, but you're left with this incredibly versatile dish that can take so many different forms. It's great as a main dish or a side, you can form it into round flat discs for risotto cakes, but one of my favorite things to make are arancini - fried risotto balls with mozzarella cheese in the centers.

Corn Risotto with Parsley and Chives
Serves 4 people

Ingredients
2 Tbsps. butter
2 shallots (or 1 medium onion), chopped
1 cup Arborio rice
1/2 cup dry white wine
5-6 cups chicken stock
1 cup frozen corn
2 Tbsps. chives, finely chopped
3 Tbsps. parsley, roughly chopped
1/4 grated Parmesan cheese
Salt to taste
2 tsp. grated lemon zest

Steps
1. Heat the butter in a large heavy-bottomed saucepan over medium heat. Add the shallots and stir. Saute until softened, about 2-3 minutes.
2. Add the rice and cook, stirring often until lightly toasted, 1-2 minutes. **Make sure you keep stirring and adjust the heat if necessary to prevent burning the shallots or rice.


3. Add the wine and cook, stirring, until absorbed.

4. Ladle about 1 cup chicken stock into the saucepan and cook at a strong simmer, stirring constantly until absorbed. Continue to simmer and add stock a little at a time. Allow time for each addition to be absorbed before adding more. Cook until rice is tender and creamy looking, about 20-30 minutes. It is important to not rush this step - if the heat is too high it can burn the risotto.


5. Add the frozen corn when risotto is about 10 minutes away from done. The corn will defrost as the rice continues to cook. Fold in the herbs gently and add the Parmesan and stir. **Salt to taste -- the amount you add depends on the kind of chicken stock used -- ready-made stock is usually saltier than the home-made kind. The Parmesan also adds some saltiness. Top with lemon zest and serve immediately.


One of the reasons I love risotto so much is because you can keep the same base but add different vegetables each time. I am partial to asparagus and artichokes. Frozen vegetables can usually be folded into the risotto like with the corn, but fresh veggies should be cooked beforehand. Fully cooked vegetables can be added to the risotto before adding the cheese. I've used mushrooms, peas, artichokes, spring onions, and asparagus. You can experiment with your favorite veggies and herbs to find your own combination.

So I'll end with a song that's been in my head all day and reminds me of something else that brings me comfort - Love Actually: http://www.youtube.com/watch?v=AOMyS78o5YI.

Sunday, March 31, 2013

How to make Funfetti cupcakes even more Fun!

I love baking. I think it's so relaxing and it's the perfect way to spend a Saturday afternoon. I usually go for those really intricate recipes that take several hours and leave a whole sink full of dishes, but last weekend I was in the need of something different. At 7pm on Saturday night I got home from the gym and I needed to whip-up some birthday cupcakes before heading to my friend's place in two hours. While I'm sure my friends would have been happy with some regular funfetti cupcakes, I had a reputation to uphold, so I decided to jazz them up a little bit. I made rainbow colored tie-dye birthday cupcakes! So since this isn't a real recipe, and I just followed the funfetti box directions, I'll just tell this story through pictures:


Don't they look cool?! The colors came out so bright and everyone loved them.
So basically, once you follow the regular box directions- you split the batter up into six different cups.
Then you dye each cup a different color bu adding a little drop of food coloring at a time and stirring, continuing until you get the desired color.
Add one teaspoon of each batter to the cupcake pans. This was the most time consuming part, but it doesn't have to be perfect- using two teaspoons to scoop and then scrape was the fastest method I came up with. 
And obviously do purple to all of them first, then blue, then green, etc. (That may seem self explanatory but I know one of you out there was going cup by cup!) They looked so pretty and bright in the pan that I didn't want to bake them!

And there you have it! Add some silly icing, some sprinkles, and you have a really fun, funfetti cupcake surprise! 


And sticking with the fun theme.. here you go: http://www.youtube.com/watch?v=q7yCLn-O-Y0


Wednesday, March 20, 2013

I Love a Southwest Salad

Sorry it's been so long since I last posted- it's been a busy couple of weeks! I've had a wonderful 10 days of visitors- first my parents and then Erin and Emily, two of my former co-workers, came into town. My time was full of good conversation, good wine, and mostly good food. One of the greatest things for me about my parents visiting is that I'm always left with a fridge stock full of food. However, this blessing isn't the greatest thing for my new blogging hobby! While I've slowly been going through the restaurant left-overs, I had the day off work today and I decided to head back into the kitchen.

For one of the many concoctions we whipped up during my reunion weekend, a whole can of chipotle peppers was purchased. Now I love the flavor of chipotle, but I have to say, I don't really know who needs that whole can! Amongst the many things left in my apartment once all my wonderful friends departed, was an entire tupperware of delicious, smoky, spicy-sweet chipotle peppers. After whipping up some chipotle hummus, I realized I needed to make something a whole lot bigger if I was going to make a dent in my pepper stock. I knew I wanted to eat salads this week, because after a week of eating out, my veggie intake was seriously lacking. One of my favorite salads of all time is a southwest salad. After perusing on pinterest, it was decided- grilling a Chipotle Glazed Pork Tenderloin would satisfy my ingredient, craving, and budget needs. 


Doesn't that look delicious?

 Here are the ingredients I used for the glaze- I'm pretty sure you could get away with only using about four of them (chipotle peppers, brown sugar, ketchup and lime juice), but I had most of them in my kitchen already.
 I couldn't quite capture how beautiful the sauce looked- it was a deep red with these goldish tints in it- and little green flakes from the cilantro.. yummmmm!
 I had to give a shout-out for my immersion blender. I love this thing! I use it for smoothies, hummus, soup, and now chipotle glazes. It's definitely a non-necessity tool, but for $30, you won't regret it- you have my word. 
Now I know there are a lot of women my age out there who claim to hate pork. I don't why this is, but I think it's a hidden gem in the grocery store. It's a good source of protein, leaner than red meat, it's filling, and most of all it's so cheap! I got this whole tenderloin for $5.48 from Trader Joes- pretty impressive, right?

I like to pretend I have a grill by using this grill pan and getting sear marks when I'm cooking meat- definitely makes me feel a little fancier. The trick is to not turn the meat too much and to keep it on the pan a little longer then you think you should- it's not burning- just getting those nice lines!

I put the glaze on there as it baked and once I took it out, I had a beautiful smoky, spicy-yet-sweet pork tenderloin. Throw it on some baby spinach with roasted corn, feta, and sauteed zucchini and you have yourself a delicious well-balanced salad!

Oh and here's a song for today- it's been stuck in my head all day: http://www.youtube.com/watch?v=OpQFFLBMEPI

Ingredients for the pork tenderloin:
3-4 chipotle peppers + 1 tbsp adobo sauce (I used this can)
1.5 tbsp brown sugar
1 tbsp ketchup
1 tsp lime juice
1 tsp diced garlic
2 tbsp cilantro
1/2 tsp cumin
1 tsp salt
~1.25 pound pork tenderloin

Extra ingredients for the salad:
1.5 cups baby spinach
2 tbsp corn (I used Trader Joe's frozen roasted corn- which is delicious!)
2 tbsp sauteed zucchini (just toss it on a pan with olive oil salt and pepper)
1 tsp crumbled feta

Directions:
1) Blend peppers, brown sugar, ketchup, lime juice, garlic, cilantro, cumin and salt until smooth and there are no longer chunks of pepper in the sauce.
2) Trim fat off of pork tenderloin and cover in sauce. Refrigerate for a couple hours or overnight if time allows.
3) Sear pork tenderloin on grill or grill pan, if you have one available (if not, just bake a little longer). 
4) Finish pork tenderloin in the oven at 350 degrees for 15-20 minutes- adding glaze and turning tenderloin every five minutes. 
5) Allow tenderloin to sit for 10-15 minutes before cutting.
6) If tossing with a salad- toss it in your salad!
7) Enjoy!

Monday, March 18, 2013

Family Traditions

Growing up, I was a very lucky girl.

I have already talked a little about my grandmother (my mom's mom) in India. She was so talented - every time we visited her and my grandfather in Bombay she would make a feast for every meal. I always went back home a little rounder than when I had arrived. She went out of her way to make my brother and I feel at home. I can still hear her sticking up for me when I wanted a little more ghee on my rice and daal. I miss her hugs, the way she smelled, and how she always wore saris, even to sleep.

My mom learned a lot of what she knows about food from her mother, including an appreciation for Continental food, or Western cuisines. My Aji used to make traditional Indian food as well as German, Italian, and Chinese dishes and so much more. For years my mom has followed the example of her mother. She makes the best food I've ever tasted - check out her blog. Basically everything she makes is delicious.

I read this Buzzfeed article a few weeks ago that does a pretty good job of pinpointing a lot of my experiences as a kid. I was always the brown/Asian Disney princess, I usually had atypical lunches (but sometimes they were McDonalds and that was awesome), home remedies are still primary medical solutions in my house, and I will always have to decode my mom's hybrid language. But the last gif is undoubtedly true - I wouldn't change a thing.

Now here's why I was (and am) so lucky. Holidays are a big thing in my family. As a dual-religion household (Hinduism and Catholicism), we celebrate Christmas and Diwali, Easter and Ganpati, as well as lots of other holy days. But we also celebrate other cultural holidays in the best way we know how - through food. On the Chinese New Year we have fried rice and stir frys, during Hanukkah we have latkes, and on Thanksgiving we have a traditional turkey dinner with all the sides -- no Indian spices allowed as per my strict instructions. But one of my favorite traditions that we have is Irish stew on St. Patrick's Day. We usually have Soda Bread too, but a lack of ingredients (and my mom and I usually eating the entire loaf ourselves) led to only the stew this year. Still feels like St. Paddy's Day and tastes like tradition.

Shiny, shiny onions

Close-up of that seared meat

Best - and easiest - chicken broth

Bouquet of flowers? Bouquet garni!

Nestled bouquet before the lid goes on

My favorite vegetable

Magical pressure cooker, which is sometimes scary when the steam comes out


Irish Stew
Serves 4 (hungry) people

Ingredients:
1 lb. lamb shoulder
3 Tbsp. canola oil, for frying
1 medium onion, diced
3-4 sprigs of thyme
1/2 packet of portabella mushrooms, sliced
4 Tbsp. barley
3/4 cup pearl onions
2 cups chicken broth
1 1/2 tsp. kosher salt
1 bouquet garni (parsley, thyme, bay leaf)
1 large potato, thickly sliced
Handful of parsley, chopped
3 Tbsp. chives, chopped

** I used a pressure cooker because it cooks the meat faster, so my directions will follow that method. You can also cook the stew in a heavy-bottomed pot or saucepan, but the cook time will be much longer - about 2 hours. **

Steps:
1. Cut the lamb into chunks. You can leave some meat on a couple of the bones - it'll add flavor to the dish. 

2.  Heat the oil on a medium-high flame. Add the diced onions and cook, stirring often, until they are translucent. Then add the thyme.

3. Add the meat and stir. Get a good sear on all sides of the meat to lock in flavor. While it is browning, add the mushrooms and let them cook. Carrots are a great addition to the stew - I would've added them myself, but I was all out. Just cut them into chunks and add them in this step.

4. Once the meat and mushrooms have browned, add the barley and pearl onions. Stir to mix.

5. Add enough chicken broth to almost cover the meat. I like to use Trader Joe's chicken broth packets. They are a quick and easy substitute when you don't have homemade stock. Just follow the instructions on the packet. I poured 2 cups of water to cover the meat and then added the flavor packets directly into the pot.

6. Make the bouquet garni. Grab a handful of parsley and thyme and one bay leaf. Tie the whole bundle together with string and nestle it in the pot.

7. Add the potato and salt and stir to mix. Put the cover on the pressure cooker. **If using a regular pot, lower the flame and cover with a lid. Cook for 2 hours.**

8. Once the pressure cooker releases its steam, lower the flame and cook for 15 minutes.

9. Remove the lid and the bouquet. Garnish with parsley and chives and serve with rice or soda bread.

I find the best side for any Irish dish is, naturally, more potatoes.

And because this post is about my family and warm memories, here's one of my favorites: http://www.youtube.com/watch?v=NZtJWJe_K_w